SEC504: Hacker Tools, Techniques, and Incident Handling
SEC504Offensive Operations


Over the years, there has been a clear need for some digital forensic toolsets that will accomplish basic goals. The first of those goals is creating an environment friendly to analyzing acquired file system images.
The SIFT workstation was created as a part of the SANS Computer Forensics, Investigation, and Response course which is also known as SEC 508. With the launch of the community website at http:\forensics.sans.org it is useful to go through some basic architecture of how the SIFT Workstation actually can be useful for you.
The blog series "SIFT'ing" will show to utilize the workstation using a series of exercises. Today we will discuss how to use the SIFT workstation to mount and examine a Windows NTFS image.
The SIFT already should be able to be seen from the Windows machine you have it installed on. The SIFT workstation, by default, is in VMware HOST ONLY mode, but you can modify that in the VMware Machine Settings.
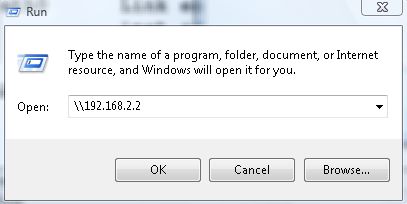
Find out the IP Address of your machine by running ifconfig:

Obtain the IP Address of your SIFT Workstation using ifconfig
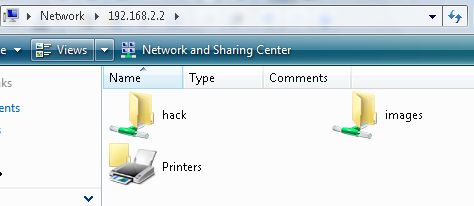
You can now see your shares on your SIFT Workstation
We will now mount an NTFS filesystem in read-only mode on the SIFT workstation and examine the files from our Windows machine.
I use the notation YYYYMMDD as my case name in many cases. I label evidence usually the same way, but with th evidence tag as an additional two numbers at the end. For example 20090204 is the case name and the first piece of evidence would be 20090204-01 for my records.
I put all evidence in the evidence locker in the /images directory. Usually, evidence I am actually analyzing will be "working copies" and not "best or original evidence." I use the /mnt/hack directory as the location where I mount my partitions.
ro= READ ONLY
loop= Use Loopback device
show_sys_files= Show NTFS Metadata files
Mounting your "working copy" of the evidence in read-only mode.
You can see the mounted image file via your Windows machine in Read-Only Mode
You can now see the mounted filesystem from Windows if you browse to the \192.168.2.2\hack\windows_mount directory. This is in read-only mode so you cannot change the data of the files. In addition, you can also see the NTFS metadata files.
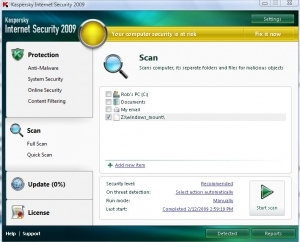
Using a virus scanner is always a good first step once you have your evidence mounted in read-only mode
Many usually map a network drive, such as Z: to the mounted read-only file system so any windows tool can easily parse data from the mounted partition.
From here I always recommend that one of the first steps would be to scan the read-only file system using a virus scanner or two. Here is a screen shot of performing a virus scan against the read-only file system.
Mounting raw images is fairly simple using the SIFT Workstation. The next time we visit mounting images, we will discuss how to mount either AFF (Advanced Forensic Format) or EWF (Expert Witness) image files. However, if you cannot wait that long, I have a webcast called "Imagine This!" that discusses the basics of handling different image formats posted now over at http://forensics.sans.org
If you have any questions or have trouble getting this to work on your case, please email me at rlee@sans.org. Sign up for my NEW class SEC408 Computer Forensic and E-Discovery Essentials debuting at SANSFIRE 2009.
Rob Lee is a Principal Consultant for MANDIANT, a leading provider of information security consulting services and software to Fortune 500 organizations and the U.S. Government. Rob has over 13 years experience in computer forensics, vulnerability discovery, intrusion detection and incident response. Rob is the lead course author and faculty fellow for the computer forensic courses at the SANS Institute.
